“How to change the appearance of the Game”
You can change the appearance of the game in all its aspects by substituting the image assets.
For doing so, you may use your favorite image editing software or vector graphics software, if you don't have any, we warmly encourage you to use GIMP, if you prefer working with pixels, or Inkscape if you prefer working with vectors. Both are free and open source software which running on Windows, Linux, OSX.
A) Changing the Player Sprite - top
Player sprite animations are stored inside the animation sheet located at data/img/sprite/player.png.
Here below is shown how is arranged the provided player's animation sheet.
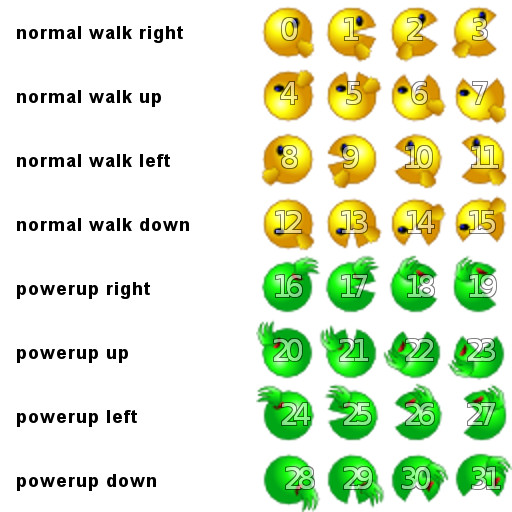
The grid is 32 x 32 pixels, first frame is the upper left one and starts with index 0, so, when player walks to right, for example, the animation that is used is made by frames 0 ,1, 2, 3, 2, 1 and then loops from frame 0.
Animation frames are defined in the configuration file in player animation section.
The walk to right animation looks like this:
var PLAYER_ANIMATION_NORMAL_RIGHT_WALK = [0,1,2,3,2,1];
If you vary the length of animation you must reflect such change in animations definitions inside the configuration file too.
Other animation, like victory or death, are made by recycling frames from walk animations, anyway, you are free to make a bigger sheet and add more new frames.
B) Changing Enemies Sprites - top
The game comes with four preset enemy types. They are located in data/img/sprite/ folder and are named green_enemy.png, magenta_enemy.png, red_enemy.png, yellow_enemy.png.
Animation sheets for enemies follow the same logic of the player one.
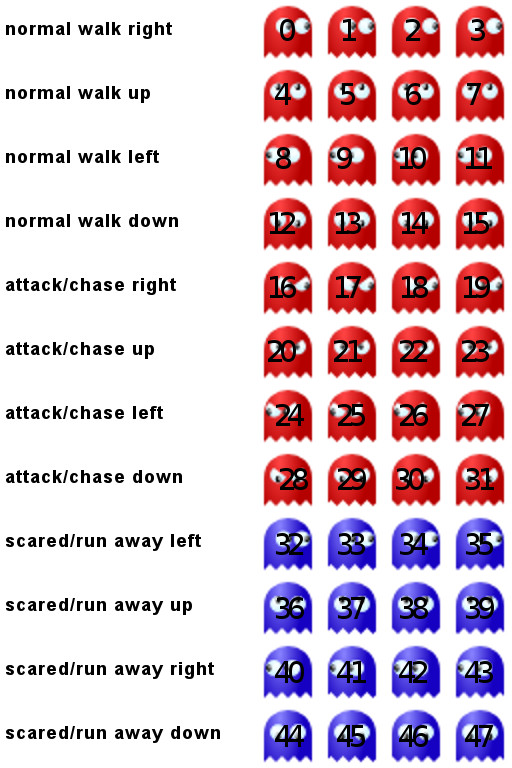
Bite animation (when an enemies capture the player) and ending animation (when player power up time is near finishing) recycle frames from other animation, you can produce specific frames for those animations, if you wish, enlarging the animation sheet.The bite animation (that is when an enemies capture the player) and the ending animation (that is when player power-up time is finishing) are made by recycling frames from others animations, you can produce specific frames for those animations, if you wish, enlarging the animation sheet.
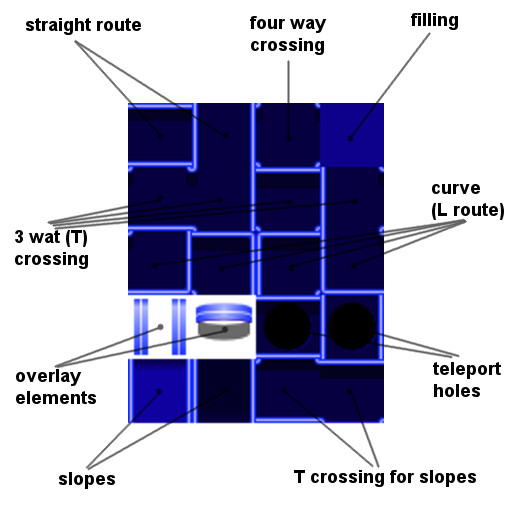
C) Changing the Background Graphic - top
Typically levels backgrounds are made by tile maps, this permit the engine to generates large backgrounds from re-using a number of smaller graphics to save RAM and increase rendering performance.
Tile maps graphics are stored in data/img/map/. Here below is shown tiles.png and how each tile is used in levels. You may expand tileset as you like with newer tiles if you need in making new levels by using the Tiled application.
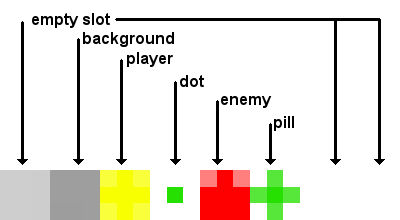
D) Changing Radar Screen Graphic - top
Radar graphic file is stored in data/img/gui/, its name is radar.png. Here below is shown how it's used by the game.